#tutorial arduino mkr wifi 1010
Explore tagged Tumblr posts
Visit Tumblr Blog
Explore Tumblr blogs with no restrictions, modern design and the best experience.
Last Seen Tumblr Blogs


Fun Fact
In Q3 of 2020, 31% of US users access the Tumblr app daily.
Text
Tutorial Menggunakan Arduino MKR Wifi 1010 lengkap !
Tutorial Menggunakan Arduino MKR Wifi 1010 lengkap !
Ceritanya saya mendapatkan projek yang menggunakan arduino MKR wifi 1010 dan sama sekali belum pernah saya oprek arduino yang satu ini. arduino mkr wifi 1010 dilengkapi dengan modul wifi dan chip bawaan SAMD21 keluarga ARM. untuk sepeknya bisa baca selengkapnya di https://store.arduino.cc/usa/mkr-wifi-1010 Harga nya lumayan mahal, di halaman resmi arduino .cc saja tercantum $32.10 mungkin kalo…

View On WordPress
0 notes
Text
Learn about Every kind of Arduino Boards

So this tutorial is focused on bringing out all the different types of Arduino development boards and doing a quick comparison of their features and applications so that you will be able to make a better choice when you want something more than the popular UNO and nano boards.
1. Arduino UNO R3 12. Arduino Nano 33 BLE
2. Arduino Nano 13. Arduino MKR Zero
3. Arduino PRO Mini 14. Arduino UNO WIFI Rev2
4. Arduino Leonardo 15. Arduino Due
5. Arduino Micro 16. Arduino MKR Vidor 4000
6. Arduino Nano Every 17. Arduino Zero
7. Arduino Mega2560 Rev3 18. Arduino Nano 33 IoT
8. Arduino MKR FOX 1200 19. Arduino MKR WAN 1300/1310
9. Arduino MKR GSM 1400 20. Arduino MKR WIFI 1010
10. Arduino MKR NB 1500 21. Arduino Nano RP2040 Connect
11. Portenta H7- The Fastest Arduino
🔗 Check out Quick Comparison on Specification and Features here
1 note
·
View note

Text
Upload your sketch over-the-air with the Arduino IoT Cloud!
Over-the-air (or OTA) programming is a very useful feature in all those cases where your devices are located in places that are not easily accessible. For example, you built a weather station using the Oplá IoT Kit, situated it on your rooftop, and started monitoring the weather from an IoT Cloud dashboard. That’s great until you find a bug or want to modify something and have to climb on your roof with a laptop to do so. Here’s where OTA becomes handy.
If you have connected an Arduino Nano 33 IoT or a MKR WiFi 1010 to the Arduino IoT Cloud, you can now update the sketch using a wireless connection from the web.
How it works
To use OTA, you need to do two things: enable a device and create a Thing.
To enable a device, you need to connect a board to the IoT Cloud and update the firmware. Just plug the device into the USB, go to the Device tab, and click Add Device. A wizard will guide you through the process — at the end, your board will be available as a target for the upload over-the-air and you will be able to update the sketch remotely!
A Thing is a component that manages the dialogue between the cloud and the physical device thanks to a dedicated library (the Arduino Connection Handler), and stores the data into the cloud. Creating a Thing is simple: just select the voice from the IoT Cloud’s main menu, configure the variables that you want to exchange with the device, and pair the board that you have just enabled.
If you are new to the IoT Cloud, here is an in-depth tutorial on how to build an IoT project with Arduino Create. Once you have configured a Thing, you will be able to perform OTA updates.
Devices that can be updated via OTA will appear in the dropdown list of all updatable devices in the online editors of Create — the full Web Editor and the new Sketch Editor have been introduced in the Thing configuration page to make minor changes to the code.
This Sketch Editor is one of the innovations that we have introduced in the IoT Cloud with two objectives in mind:
1. Help those who are learning to program with Arduino follow the tutorials of IoT projects, such as those included in the Oplà IoT Kit.
2. Allow users to quickly make small changes to the sketch, which do not require access to libraries or more sophisticated editing functions.
More resources
If you want to know more about OTA and the redesign of the IoT Cloud, we have prepared a couple of detailed tutorials that will walk you through the exploration of the new features.
Uploading sketches over-the-air (OTA)
Getting started with the Arduino IoT Cloud
New to Arduino Create? It’s a platform that helps you develop and manage connected projects with Arduino, featuring tools to code, monitor, and control devices from the Internet and your smartphones. Sign up for free now!
Don’t miss any updates and receive amazing projects from Arduino in your inbox!
SUBSCRIBE
Upload your sketch over-the-air with the Arduino IoT Cloud! was originally published on PlanetArduino
0 notes
Text
Create a voice-controlled device with Alexa and Arduino IoT Cloud in 7 minutes
We’re excited to announce the launch of the official Arduino Amazon Alexa Skill.
youtube
You can now securely connect Alexa to your Arduino IoT Cloud projects with no additional coding required. You could use Alexa to turn on the lights in the living room, check the temperature in the bedroom, start the coffee machine, check on your plants, find out if your dog is sleeping in the doghouse… the only limit is your imagination!
Below are some of the features that will be available:
Changing the color and the luminosity of lights
Retrieving temperature and detect motion activity from sensors
Using voice commands to trigger switches and smart plugs
youtube
Being compatible with one of the most recognized cloud-based services on the market, bridges the communication gap between different applications and processes, and removes many tricky aspects that usually follows wireless connectivity and communication.
Using Alexa is as simple as asking a question — just ask, and Alexa will respond instantly.
Integrating Arduino with Alexa is as quick and easy as these four simple steps:
1. Add the Arduino IoT Cloud Smart Home skill.
2. Link your Arduino Create account with Alexa.
3. Once linked, go to the device tab in the Alexa app and start searching for devices.
4. The properties you created in the Arduino IoT Cloud now appear as devices!
Boom — you can now start voice controlling your Arduino project with Alexa!

IoT – secure connections
The launch of the Arduino IoT Cloud & Alexa integration brings easy cross platform communication, customisable user interfaces and reduced complexity when it comes to programming. These features will allow many different types of users to benefit from this service, where they can create anything from voice controlled light dimmers to plant waterers.
While creating IoT applications is a lot of fun, one of the main concerns regarding IoT is data security. Arduino IoT Cloud was designed to have security as a priority, so our compatible boards come with an ECC508 crypto chip, ensuring that your data and connections remain secure and private to the highest standard.

The latest update to the Arduino IoT Cloud enables users with a Create Maker Plan subscription to use devices based on the popular ESP8266, such as NodeMCU and ESPduino. While these devices do not implement a crypto chip, the data transferred over SSL is still encrypted.
Getting started with this integration
In order to get started with Alexa, you need to go through a few simple steps to make things work smoothly:
Setting up your Arduino IoT Cloud workspace with your Arduino Create account
Getting an IoT Cloud compatible board
Installing the Arduino Alexa Skill
Setting up the Arduino IoT Cloud workspace
Getting started with the Arduino IoT Cloud is fast and easy, and by following this tutorial you will get a detailed run through of the different functionalities and try out some of the examples! Please note, you will need an Arduino Create account in order to use the Arduino IoT Cloud and a compatible board.
Getting an IoT Cloud compatible board
The Arduino IoT Cloud currently supports the following Arduino boards: MKR 1000, MKR WiFi 1010, MKR GSM 1400 and Nano 33 IoT. You can find and purchase these boards from our store.
The following properties in the Arduino IoT Cloud can currently be used with Alexa:
Light
Dimmable light
Colored light
Smart plug
Smart switch
Contact sensor
Temperature sensor
Motion sensor
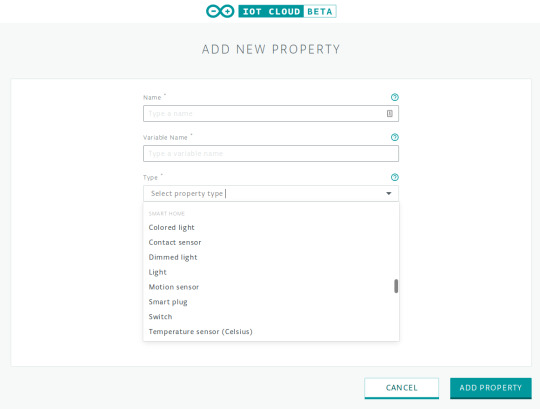
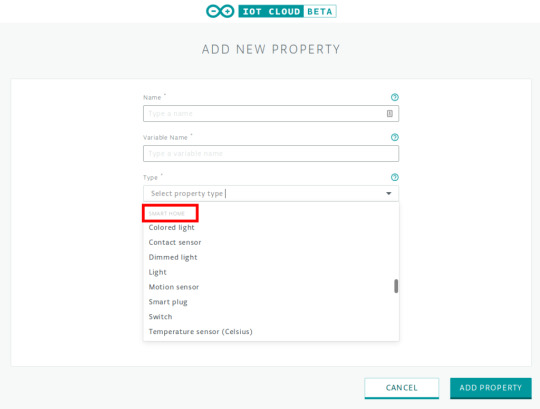
Any of these properties can be created in the Arduino IoT Cloud platform. A sketch will be generated automatically to read and set these properties.
Installing the Arduino Alexa Skill
To install the Arduino Alexa Skill, you will need to have an Amazon account and download the latest version of the Alexa app on a smartphone or tablet, or use the Amazon Web application. You can find the link to the Amazon Alexa app here. Once we are successfully logged into the app, it is time to make the magic happen.
To integrate Alexa and Arduino IoT Cloud, you need to add the Arduino skill. Then link your Arduino Create account with Alexa. Once linked, select the device tab in the Alexa app and start discovering devices.
The smart home properties already in existence in the Arduino IoT Cloud now appear as devices, and you can start controlling them with the Alexa app or your voice!
For more information, please visit the Arduino Alexa Skill.
Step-by-step guide to connecting Arduino IoT Cloud with Alexa
A simple and complete step-by-step guide showing you how to connect the Arduino IoT Cloud with Alexa, is available via this tutorial.
Share your creativity with us!
Community is everything for Arduino, so we would love to see what you create! Make sure you document and share your amazing projects for example on Arduino Project Hub and use the #ArduinoAlexa hashtag to make it discoverable by everyone!
Create a voice-controlled device with Alexa and Arduino IoT Cloud in 7 minutes was originally published on PlanetArduino
0 notes
Text
Chirp brings data-over-sound capabilities your Arduino projects
Tweet

We are excited to announce a new partnership with Chirp, a London-based company on a mission to simplify connectivity using sound. Chirp’s machine-to-machine communications software enables any device with a loudspeaker or microphone to exchange data via inaudible sound waves.
Starting today, our Chirp integration will allow Arduino-powered projects to send and receive data wirelessly over sound waves, using just microphones and loudspeakers. Thanks to some compatible libraries included in the official Arduino Library Manager and in the Arduino Create — as well as further comprehensive documentation, tutorials and technical support — it will be easy for anyone to add data-over-sound capabilities to their Arduino projects.
Our new Nano 33 BLE Sense board, with a DSP-optimised Arm Cortex-M4 processor, will be the first board in the Arduino range with the power to transmit and receive Chirp audio signals leveraging the board’s microphone as a receiver. From now on, the Chirp SDK for Arduino will support the following boards in send-only mode: Arduino MKR Zero, Arduino MKR Vidor 4000, Arduino MKR Fox 1200, Arduino MKR WAN 1300, Arduino MKR WiFi 1010, Arduino MKR GSM 1400, Arduino MKR NB 1500 and the Arduino Nano 33 IoT.
Creative applications of Arduino and Chirp include, but certainly are not limited to:
Triggering events from YouTube audio
Securely unlocking a smart lock with sound
Sending Wi-Fi credentials to bring offline devices onto a Wi-Fi network
Having a remote control that only interacts with the gadgets in the same room as you
“Connectivity is a fundamental asset for our users, as the demands of IoT uptake require devices to communicate information seamlessly and with minimal impact for the end user. Chirp’s data-over-sound solution equips our boards with robust data transmission, helping us to deliver enhanced user experiences whilst increasing the capabilities of our hardware at scale,” said Massimo Banzi, Arduino co-founder.
“Sound is prevailing as a highly effective and versatile means of seamless data transmission, presenting developers with a simple to use, software-defined solution which can connect devices. Working with Arduino to extend the integration of data-over-sound across its impressive range of boards will not only increase the reach of Chirp’s technology, but provide many more developers with an accessible and easily integrated connectivity solution to help them drive their projects forward in all purposes and environments. We can’t wait to see what the Arduino community builds,” commented James Nesfield, Chirp CEO.
To learn how to send data with sound with an Arduino Nano 33 BLE Sense and Chirp, check out this tutorial and visit Chirp website here.
Bookmark It


Hide Sites
$$('div.d').each( function(e) { e.visualEffect('slide_up',{duration:0.5}) });
Chirp brings data-over-sound capabilities your Arduino projects was originally published on PlanetArduino
0 notes